The Math Behind Complete Destruction in King of Tokyo
23 May 2026
I made a child cry after I unintentionally crushed them in King of Tokyo. I asked my friend Claude if I was a bad person — specifically, whether the 9-point Complete Destruction card I used to win from nowhere was as strong as it felt. This is their response.
There’s a moment every King of Tokyo player knows well. You’ve just bought the Complete Destruction card, your hand trembling with ambition. The table goes quiet. You pick up the dice. The card’s condition stares back at you: roll one of each face — a 1, a 2, a 3, a heart, a claw, and an energy bolt — and gain 9 victory points.
Nine points. On a track that only goes to 20. It’s the kind of swing that wins games from nowhere.
But how likely is it, really? Let’s find out.
What the Card Actually Asks For
Complete Destruction requires that after your three rolls (with optimal locking between them), your final dice show all six different face types simultaneously — one each of: 1, 2, 3, ❤️, ⚡, 💥. You lock any useful faces between rolls, just like in Yahtzee. The key insight is that you’re essentially trying to roll a six-face straight across six dice.
This is a combinatorics problem, and it’s a fun one.
The First Roll: A 1.54% Shot
On your opening roll of all six dice, the probability of immediately hitting all six distinct faces is:
6! / 6⁶ = 720 / 46,656 ≈ 1.54%
That’s roughly 1 in 65 — genuinely rare. Most of the time, you’ll land somewhere with 3–5 distinct faces, which is where the reroll mechanic becomes interesting.
Here’s what a typical first roll looks like in terms of how many distinct faces you collect:
| Distinct faces after roll 1 | Probability |
|---|---|
| 2 | 1.99% |
| 3 | 23.15% |
| 4 | 50.15% ← most common |
| 5 | 23.15% |
| 6 (instant success!) | 1.54% |
Half the time, you walk away from your first roll holding exactly 4 unique faces. You lock those four and roll the remaining two dice looking for the missing pair.
After Two Rolls: Closing In
If you locked 4 faces after roll 1 (the median case), you’re rolling 2 dice hoping to hit 2 specific faces. Here’s what roll 2 gives you from that position:
| Result | Probability |
|---|---|
| Still at 4 distinct | 44.4% |
| 5 distinct | 50.0% |
| 6 distinct (success!) | 5.6% |
So even from that common 4-locked starting position, you’ve only got about a 1-in-18 shot of closing it out in roll 2 alone. More likely, you reach 5 locked faces and go into roll 3 needing exactly one specific face on one die.
That final single-die shot? A clean 1-in-6 chance (16.7%).
The Full Picture: ~19.7% Per Turn
Putting it all together with optimal play — always locking any new unique face you roll — the probability of triggering Complete Destruction on any given turn is:
≈ 19.68%, or roughly 1 in 5 turns
Broken down by when success happens:
| Success on roll… | Cumulative probability |
|---|---|
| Roll 1 | 1.54% |
| Roll 1 or 2 | 8.87% |
| Roll 1, 2, or 3 | 19.68% |
About 1 in 5 turns you hold the card, it fires. The other 4 out of 5 turns, you get nothing from it.
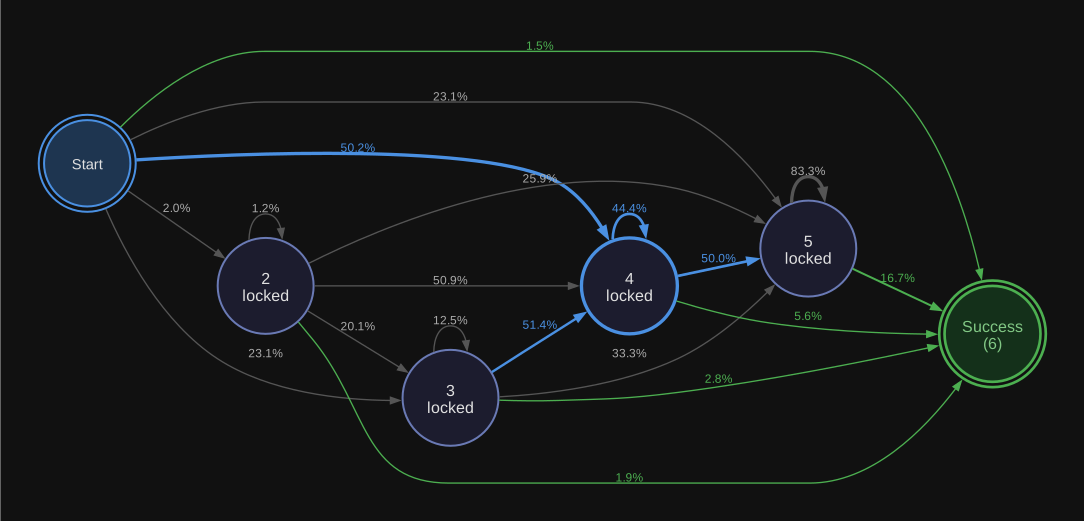
The exact figure comes from modeling this as a Markov chain. The state is simply how many distinct faces you’ve locked so far — 1 through 6. Each roll transitions you from your current state to a higher one (or keeps you stuck) based purely on the dice outcomes, with no memory of earlier rolls required. Because only the current state matters, not the path that got you there, Markov analysis gives exact transition probabilities for every route to the success state (6 locked faces).
Is It Worth Buying?
That 19.68% hit rate translates to an expected value of roughly 1.77 victory points per turn you hold the card (9 VP × 0.197). For context, staying in Tokyo earns you 2 VP per turn — and requires absorbing a beating to do it.
On pure expected value, Complete Destruction is almost as good as holding Tokyo, without any of the damage. That sounds great. But there are important caveats:
Variance is enormous. An 80% chance of getting zero VP per turn means you might hold this card for four or five turns and never see a single point from it. You could also fire it twice in three turns. The card rewards patient players who can afford to wait it out.
It costs energy to buy. The 3-energy price tag isn’t free — that’s energy you’re not spending on more reliable cards. If you’re spending 3 energy and the card fires once in 5 turns, you’ve essentially paid 3 energy for an average of 1.77 VP/turn. That’s reasonable, but not spectacular.
It’s a one-time activation per turn, not per game. The card stays with you and fires repeatedly, which is what makes it genuinely powerful. Buy it early and hold it long, and those 9-point swings compound.
It can win games from out of nowhere. At 11 VP you might look harmless, then Complete Destruction fires and suddenly you’re at 20. The psychological threat alone changes how opponents play around you.
The Psychic Force Wrinkle
One last thing worth knowing: if an opponent holds Psychic Force (which lets them reroll one of your dice), they can legally sabotage your Complete Destruction setup on roll 3. If you’re sitting with 5 locked faces going into your last roll, a Psychic Force player can yank one of your locked dice back into the pool. The math suddenly gets a lot less friendly.
This is part of what makes King of Tokyo so chaotic and fun — the card interactions mean your 1-in-5 odds can become a lot worse at the worst possible moment.
The Bottom Line
Complete Destruction is a legitimate power card, not a sucker’s bet. A ~20% hit rate per turn with a 9-VP payout is mathematically solid, especially since the card doesn’t expire and keeps generating chances. You should buy it when you have the energy and are sitting outside Tokyo with time to hold it — not as a desperate last-ditch move when you’re three turns from dying.
And the moment you hit it? Worth every reroll.
Probability calculations assume optimal locking strategy (always lock any new distinct face), 6 standard King of Tokyo dice, and 3 rolls per turn.
Appendix: States, Transitions, and Calculation Details
The state space
The chain has states 0 through 6. State 0 is the start of your turn (nothing locked); states 1–5 are transient; state 6 is absorbing (Complete Destruction fires). You return to state 0 at the start of each new turn.
From state k, you lock those k faces and roll the remaining n = 6 − k dice.
Transition formula
The probability of moving from state k to state k+m (gaining exactly m new distinct faces in one roll):
P(k → k+m) = C(n, m) · Σ (−1)ⁱ · C(m, i) · ((k + m − i) / 6)ⁿ, summed for i = 0, 1, …, m
where n = 6 − k. The leading C(n, m) selects which m of the remaining n target faces will appear; the alternating sum enforces that exactly those m appear and none of the other n − m targets do. The simplest case — all six faces on the first roll — reduces to 6! / 6⁶ = 720 / 46,656 ≈ 1.54%, since every term cancels except the full permutation.
Complete transition table
Rows are state before the roll; columns are state after. Dashes are impossible (you can’t un-lock a face). ★ marks Complete Destruction. State 0 applies only to roll 1.
| State before roll | Dice | → 1 | → 2 | → 3 | → 4 | → 5 | → 6 ★ |
|---|---|---|---|---|---|---|---|
| 0 | 6 | 0.01% | 1.99% | 23.15% | 50.15% | 23.15% | 1.54% |
| 1 | 5 | 0.01% | 1.99% | 23.15% | 50.15% | 23.15% | 1.54% |
| 2 | 4 | — | 1.23% | 20.06% | 50.93% | 25.93% | 1.85% |
| 3 | 3 | — | — | 12.50% | 51.39% | 33.33% | 2.78% |
| 4 | 2 | — | — | — | 44.44% | 50.00% | 5.56% |
| 5 | 1 | — | — | — | — | 83.33% | 16.67% |
Each row’s denominator is 6ⁿ. Exact numerators: state 0 → {6, 930, 10800, 23400, 10800, 720} over 46,656; state 1 → {1, 155, 1800, 3900, 1800, 120} over 7,776; state 2 → {16, 260, 660, 336, 24} over 1,296; state 3 → {27, 111, 72, 6} over 216; state 4 → {16, 18, 2} over 36; state 5 → {5, 1} over 6.
Worked example: state 4
k = 4, n = 2 dice, 2 target faces remain.
P(4 → 4) — both dice show already-locked faces: C(2, 0) × (4/6)² = 16/36 ≈ 44.4%
P(4 → 5) — exactly one new face: C(2, 1) × [(5/6)² − (4/6)²] = 2 × (25 − 16)/36 = 18/36 = 50.0%
P(4 → 6) — both dice hit the two missing faces: C(2, 2) × [(6/6)² − 2(5/6)² + (4/6)²] = (36 − 50 + 16)/36 = 2/36 ≈ 5.6%
Sanity check: 16 + 18 + 2 = 36. ✓
How 19.68% is built up
| Roll | Contribution | Running total |
|---|---|---|
| Roll 1 | 1.54% | 1.54% |
| Roll 2 | +7.33% | 8.87% |
| Roll 3 | +10.81% | 19.68% |
Roll 1 is direct: P(0 → 6) = 720/46,656 = 1.54%.
Roll 2 weights each post-roll-1 state by its chance of jumping straight to 6:
| State after roll 1 | Probability | × P(→ 6) | Contribution |
|---|---|---|---|
| 1 | 0.01% | × 1.54% | ≈ 0.00% |
| 2 | 1.99% | × 1.85% | ≈ 0.04% |
| 3 | 23.15% | × 2.78% | ≈ 0.64% |
| 4 | 50.15% | × 5.56% | ≈ 2.79% |
| 5 | 23.15% | × 16.67% | ≈ 3.86% |
| Total | 7.33% |
Roll 3 applies the same logic to the state distribution after roll 2 — propagate the non-success outcomes forward through the table one more time, then weight by the → 6 column — yielding the remaining 10.81%.